Growatt Modbus Integration


A native Home Assistant integration for Growatt solar inverters using direct Modbus RTU/TCP communication. Real-time data straight from your inverter — no cloud, no ShineWiFi, no dependency on Growatt's servers.
How It Works
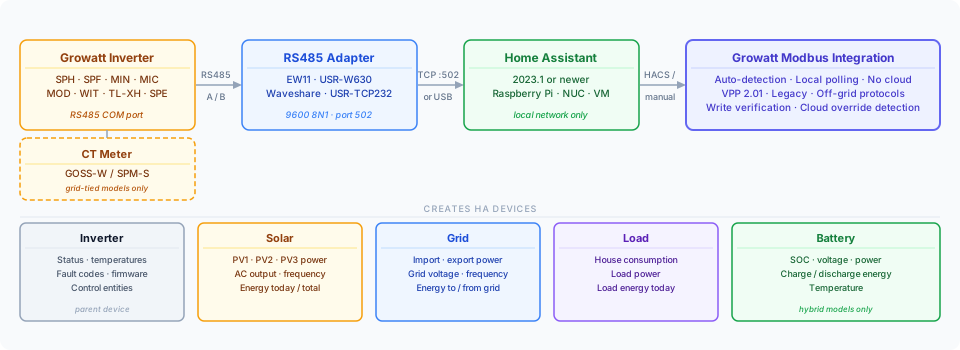
The integration polls your inverter directly over Modbus — the same protocol the inverter uses natively. A RS485-to-TCP or RS485-to-USB adapter bridges the inverter's serial port to your Home Assistant instance. No cloud account is required and no data leaves your home network.
Quick Navigation
- Supported Models — full model matrix, sensor availability, and hardware wiring
- Auto-Detection — how the integration identifies your inverter
- Entity Reference — all control entities with register details
- Battery & Scheduling — TOU and charge/discharge scheduling
- WIT Inverter Guide — VPP protocol control for WIT models
- Raising an Issue — what to include when reporting a bug
- Diagnostic Actions — Universal Register Scanner
- DTC Debugging — device type code reference
- RS485 Gateways — which adapters work, and diagnosing one that doesn't
- Adding Sensors — add registers and sensors to an existing profile
- New Profile — support a new or unsupported inverter model
- Release Notes — changelog
Installation
Requirements
- Home Assistant 2024.1 or later
- A RS485-to-TCP adapter (e.g. Waveshare, USR-W630, EW11) or a RS485-to-USB cable
- Your inverter's Modbus slave ID (usually
1— check the inverter display)
HACS (Recommended)

- Open HACS → ⋮ menu → Custom repositories
- Add
https://github.com/0xAHA/Growatt_ModbusTCP, category: Integration - Search "Growatt Modbus" in HACS → Download
- Restart Home Assistant
- Settings → Devices & Services → Add Integration → search "Growatt Modbus"
Manual
- Download the latest release and extract
- Copy
growatt_modbus/intoconfig/custom_components/ - Restart Home Assistant and add via Settings → Devices & Services
Setup
The setup wizard runs auto-detection automatically for VPP-capable inverters. For legacy models select the profile manually based on your inverter's power range.
| Parameter | TCP | Serial |
|---|---|---|
| Host / Device | IP address (e.g. 192.168.1.100) |
Path (e.g. /dev/ttyUSB0) |
| Port / Baudrate | 502 |
9600 |
| Slave ID | 1 (usually) |
1 (usually) |
| Connection hardware | What the inverter is reached through | - |
Connection hardware decides the polling timings you start with. The defaults suit a dedicated RS485 gateway; a Growatt ShineWiFi-X or ShineLan dongle needs slower, smaller reads or it drops out a minute or two after setup. Pick the one that matches and the four timing settings are filled in for you — see RS485 Gateways for the values and the evidence behind them. You can change any of them afterwards.
Options (after setup):
| Option | Default | Description |
|---|---|---|
| Device Name | "Growatt" | Prefix for all sensor names |
| Connection hardware | Dedicated RS485 gateway | Re-applies suggested timings for that hardware |
| Scan Interval | 60 s | Polling frequency (5–300 s) |
| Connection Timeout | 10 s | Response timeout (1–60 s) |
| Modbus Request Delay | 250 ms | Pause between requests (50–1000 ms) |
| Max Register Block Size | Auto | Registers per read — lower it for a gateway that truncates |
| Invert Grid Power | Auto | Fix a backwards CT clamp |
| USB / Serial Port | - | Change the adapter path without re-adding the entry |
| Host / TCP Port | - | Change the gateway address without re-adding the entry |
Use a stable path for USB adapters
/dev/ttyUSB0 is assigned in the order devices are enumerated. With more than one USB
serial adapter attached - an inverter and a battery BMS, say - a reboot can swap them, and
the integration then talks to the wrong device or fails to connect.
There are two stable alternatives, and the setup page lists both. Which one is right depends on your adapter:
| Path | Keyed on | Use it when |
|---|---|---|
/dev/serial/by-id/... |
the adapter's vendor, product and serial number | your adapter has a serial number - it then survives being moved to another socket |
/dev/serial/by-path/... |
the physical USB socket | your adapter has no serial number, or you have two identical adapters |
/dev/serial/by-id/usb-1a86_USB_Single_Serial_58CA017290-if00
/dev/serial/by-path/pci-0000:00:14.0-usb-0:5:1.0-port0
Check for a serial number before choosing by-id. The first example above ends in
58CA017290, a real serial. A name like usb-1a86_USB2.0-Serial-if00-port0 has none - it
describes the chip model only. CH340 chips (USB vendor 1a86), which most cheap RS485
adapters use, ship without serial numbers, so two identical CH340 adapters cannot be told
apart by by-id and you may end up pointing two config entries at the same one. Use
by-path for those.
If yours is not listed, run ls -l /dev/serial/by-id/ /dev/serial/by-path/ on the host and
paste the path into the manual field.
Device Structure
When you add the integration it creates up to five devices in Home Assistant, each grouping logically related sensors:
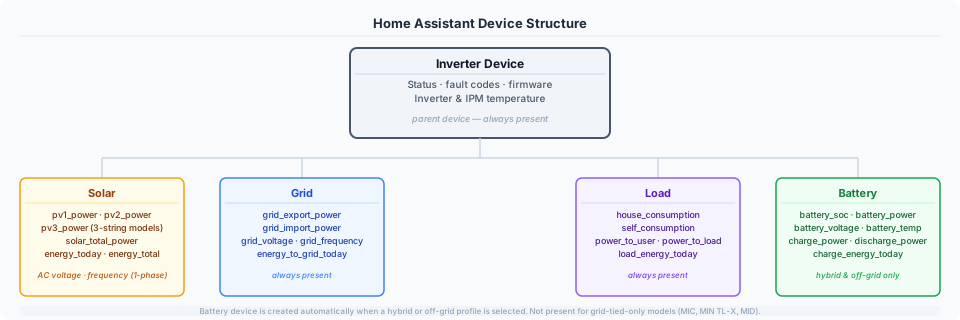
| Device | Always present? | Key entities |
|---|---|---|
| Inverter | Yes | Status, inverter temp, fault code, firmware version |
| Solar | Yes | pv1_power, solar_total_power, energy_today, energy_total |
| Grid | Yes | grid_export_power, grid_import_power, energy_to_grid_today |
| Load | Yes | house_consumption, power_to_load, load_energy_today |
| Battery | Hybrid models only | battery_soc, battery_power, charge_energy_today |
The Battery device is automatically created for hybrid and off-grid profiles. It does not appear for grid-tied-only models (MIC, MIN TL-X, MID).
Power Flow & Sensor Glossary
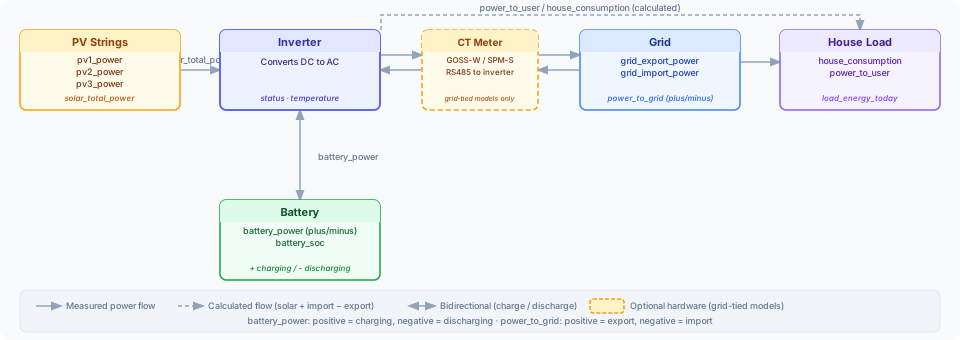
Understanding which sensor measures what is the most common source of confusion. Here is how energy flows through the system and what each sensor represents.
| Sensor | What it measures | Sign / direction | HA Energy Dashboard |
|---|---|---|---|
pv1_power / pv2_power / pv3_power |
Individual PV string output | Always ≥ 0 W | — |
solar_total_power |
Combined output of all PV strings | Always ≥ 0 W | — |
energy_today |
PV energy generated today | Always ≥ 0 kWh | Solar production |
energy_total |
PV energy generated lifetime | Always ≥ 0 kWh | Solar production |
grid_export_power |
Power currently being sent to grid | Always ≥ 0 W | Return to grid |
grid_import_power |
Power currently being drawn from grid | Always ≥ 0 W | Grid consumption |
power_to_grid |
Raw bidirectional grid register | + export / − import | (use export/import above) |
power_to_user |
AC power at grid/load boundary (register) | Always ≥ 0 W | Load monitoring |
power_to_load |
AC output power at inverter terminals | Always ≥ 0 W | — |
house_consumption |
Calculated total house draw | Always ≥ 0 W | Individual consumption |
self_consumption |
Solar power used on-site (not exported) | Always ≥ 0 W | Efficiency tracking |
battery_power |
Battery charge/discharge power | + charging / − discharging | Battery storage |
charge_power |
Battery charging power only | Always ≥ 0 W | — |
discharge_power |
Battery discharging power only | Always ≥ 0 W | — |
battery_soc |
State of charge | 0–100 % | Battery charge level |
charge_energy_today |
Energy delivered into battery today | Always ≥ 0 kWh | Battery in |
discharge_energy_today |
Energy delivered from battery today | Always ≥ 0 kWh | Battery out |
energy_to_grid_today |
Total energy exported to grid today | Always ≥ 0 kWh | Return to grid |
load_energy_today |
Total energy consumed by house today | Always ≥ 0 kWh | Individual consumption |
house_consumptionvspower_to_user:power_to_useris a raw hardware register.house_consumptionis calculated: solar produced + grid imported − grid exported. Usehouse_consumptionin the Energy Dashboard for accurate whole-home consumption.
battery_powersign: Positive = charging, negative = discharging — consistent across all models. SPF off-grid inverters report the opposite polarity in hardware; the integration corrects this automatically.
battery_currenton SPF: Register 68 only measures current during AC/grid charging. During PV charging it correctly reads 0 — this is a hardware limitation. Usebattery_powerfor monitoring.
Energy Dashboard Setup
The integration pre-configures sensors with the correct state_class and device_class for the HA Energy Dashboard. Recommended mapping:
| Dashboard slot | Sensor |
|---|---|
| Solar production | sensor.{name}_energy_total |
| Return to grid | sensor.{name}_energy_to_grid_today (use total variant) |
| Grid consumption | sensor.{name}_energy_to_user_today (use total variant) |
| Individual consumption | sensor.{name}_load_energy_today (use total variant) |
| Battery in | sensor.{name}_charge_energy_today (use total variant) |
| Battery out | sensor.{name}_discharge_energy_today (use total variant) |
If
Grid Powerreads the opposite sign to what your dashboard expects, toggle Invert Grid Power (Settings → Devices & Services → Growatt Modbus → Configure). Growatt reports positive = export while most Home Assistant cards want positive = import, so having it on is normal and common — it is a display convention, not a fault.Grid Export Power/Grid Import Powerare unaffected by it. See Invert Grid Power.
Night-time Behaviour
Inverters behave in one of two ways once the sun goes down, and the integration treats them differently. Which one you see depends on your hardware, not on a setting.
It still answers Modbus, but reports zeros ("dormant"). Common on hybrids, which stay powered for the battery. Sensors stay available holding their last daytime values, rather than dropping to zero — a lifetime total falling from 5000 kWh to 0 would otherwise read as a counter reset and spike the Energy Dashboard.
It stops answering Modbus entirely. Usual on grid-tied models, which power down completely with no sun. The inverter is marked offline and all entities go unavailable. That is deliberate: Home Assistant's statistics engine ignores unavailable states, so an unresponsive inverter leaves a gap rather than recording a flatline as though it were measured.
So unavailable entities overnight are normal on a model that powers down, and are not a fault to report. The same is true of the first minutes of daylight — an inverter showing a few watts on its display may not be answering Modbus yet.
In both cases:
last_successful_updateshows when data was last confirmed fresh- Lifetime energy totals are persisted to HA storage and restored across HA restarts
- Sensors resume normal operation automatically when the inverter wakes
After a Home Assistant restart there is nothing to hold
Retained values live in the running integration. Restart Home Assistant while the inverter is asleep and the entities stay unavailable until the first poll that succeeds, even on a model that would otherwise hold its values.
"Last Updated" on Sensors
HA only marks a sensor's last_updated timestamp when the value actually changes. If a sensor shows "last updated 4 minutes ago" it means the value has been constant for 4 minutes — not that polling stopped. The integration is still polling every scan interval; the inverter is simply reporting the same value each time.
Supported Models at a Glance
| Family | Type | Auto-detect |
|---|---|---|
| SPH TL-BH / TL3-BH | Single/three-phase hybrid | DTC |
| MOD TL3-XH | Three-phase hybrid | DTC |
| MIN TL-XH | Single-phase hybrid (small) | DTC |
| SPF ES | Off-grid | Manual |
| WIT TL3 | Three-phase commercial hybrid | DTC |
| MIC / MIN TL-X | Grid-tied | Register probe |
| MID TL3 | Three-phase grid-tied | Register probe |
| SPA TL BL | AC-coupled storage | Auto |
See Supported Models for the full matrix including sensor availability and hardware wiring.